Accéder directement au contenu
Créez un compte ou connectez-vous
Le logo de la documentation Stripe
/
Demander à l’IA
Créer un compteConnectez-vous
Commencer
Paiements
Revenus
Plateformes et places de marché
Gestion des fonds
Ressources de développement
API et trousse SDKAide
AperçuAccepter un paiementMettre votre intégration à niveau
Paiements en ligne
AperçuTrouver votre cas d'usage
Utiliser Payment Links
Utiliser une page de paiement préconfiguré
Créer une intégration personnalisée avec Elements
Développer une intégration dans l'application
    Aperçu
    Payment Sheet
    Payment Element
      Accepter des paiements dans l'application
      Personnaliser l'apparence
      Ajouter des moyens de paiement personnalisés
      Filtrer par marque de carte
    Element Address
    Mode de paiement du composant Element Messaging
    Utiliser les redirections pour les achats intégrés à l'application
    Gérer les modes de paiement dans les paramètres
    Migrer vers les jetons de confirmation
    Cartes américaines et canadiennes
Utiliser Managed PaymentsPaiements récurrents
Paiements en personne
Terminal
Moyens de paiement
Ajout de moyens de paiement
Gérer les moyens de paiement
Payer plus rapidement avec Link
Opérations de paiement
Analyses
Soldes et délai de règlement
Conformité et sécurité
Devises
Refus de paiement
Litiges
Prévention de la fraude
Radar pour la protection contre la fraude
Virements
ReçusRemboursements et annulations
Intégrations avancées
Flux de paiement personnalisés
Acquisition flexible
Paiements hors session
Orchestration multiprestataires
Au-delà des paiements
Constituer son entreprise
Cryptomonnaie
Commerce agentique
Financial Connections
Climate
Vérifier l'identité
États-Unis
Français (Canada)
AccueilPaiementsBuild an in-app integrationPayment Element

Accepter des paiements dans l'application

Build a customized payments integration in your iOS, Android, or React Native app using the Payment Element.

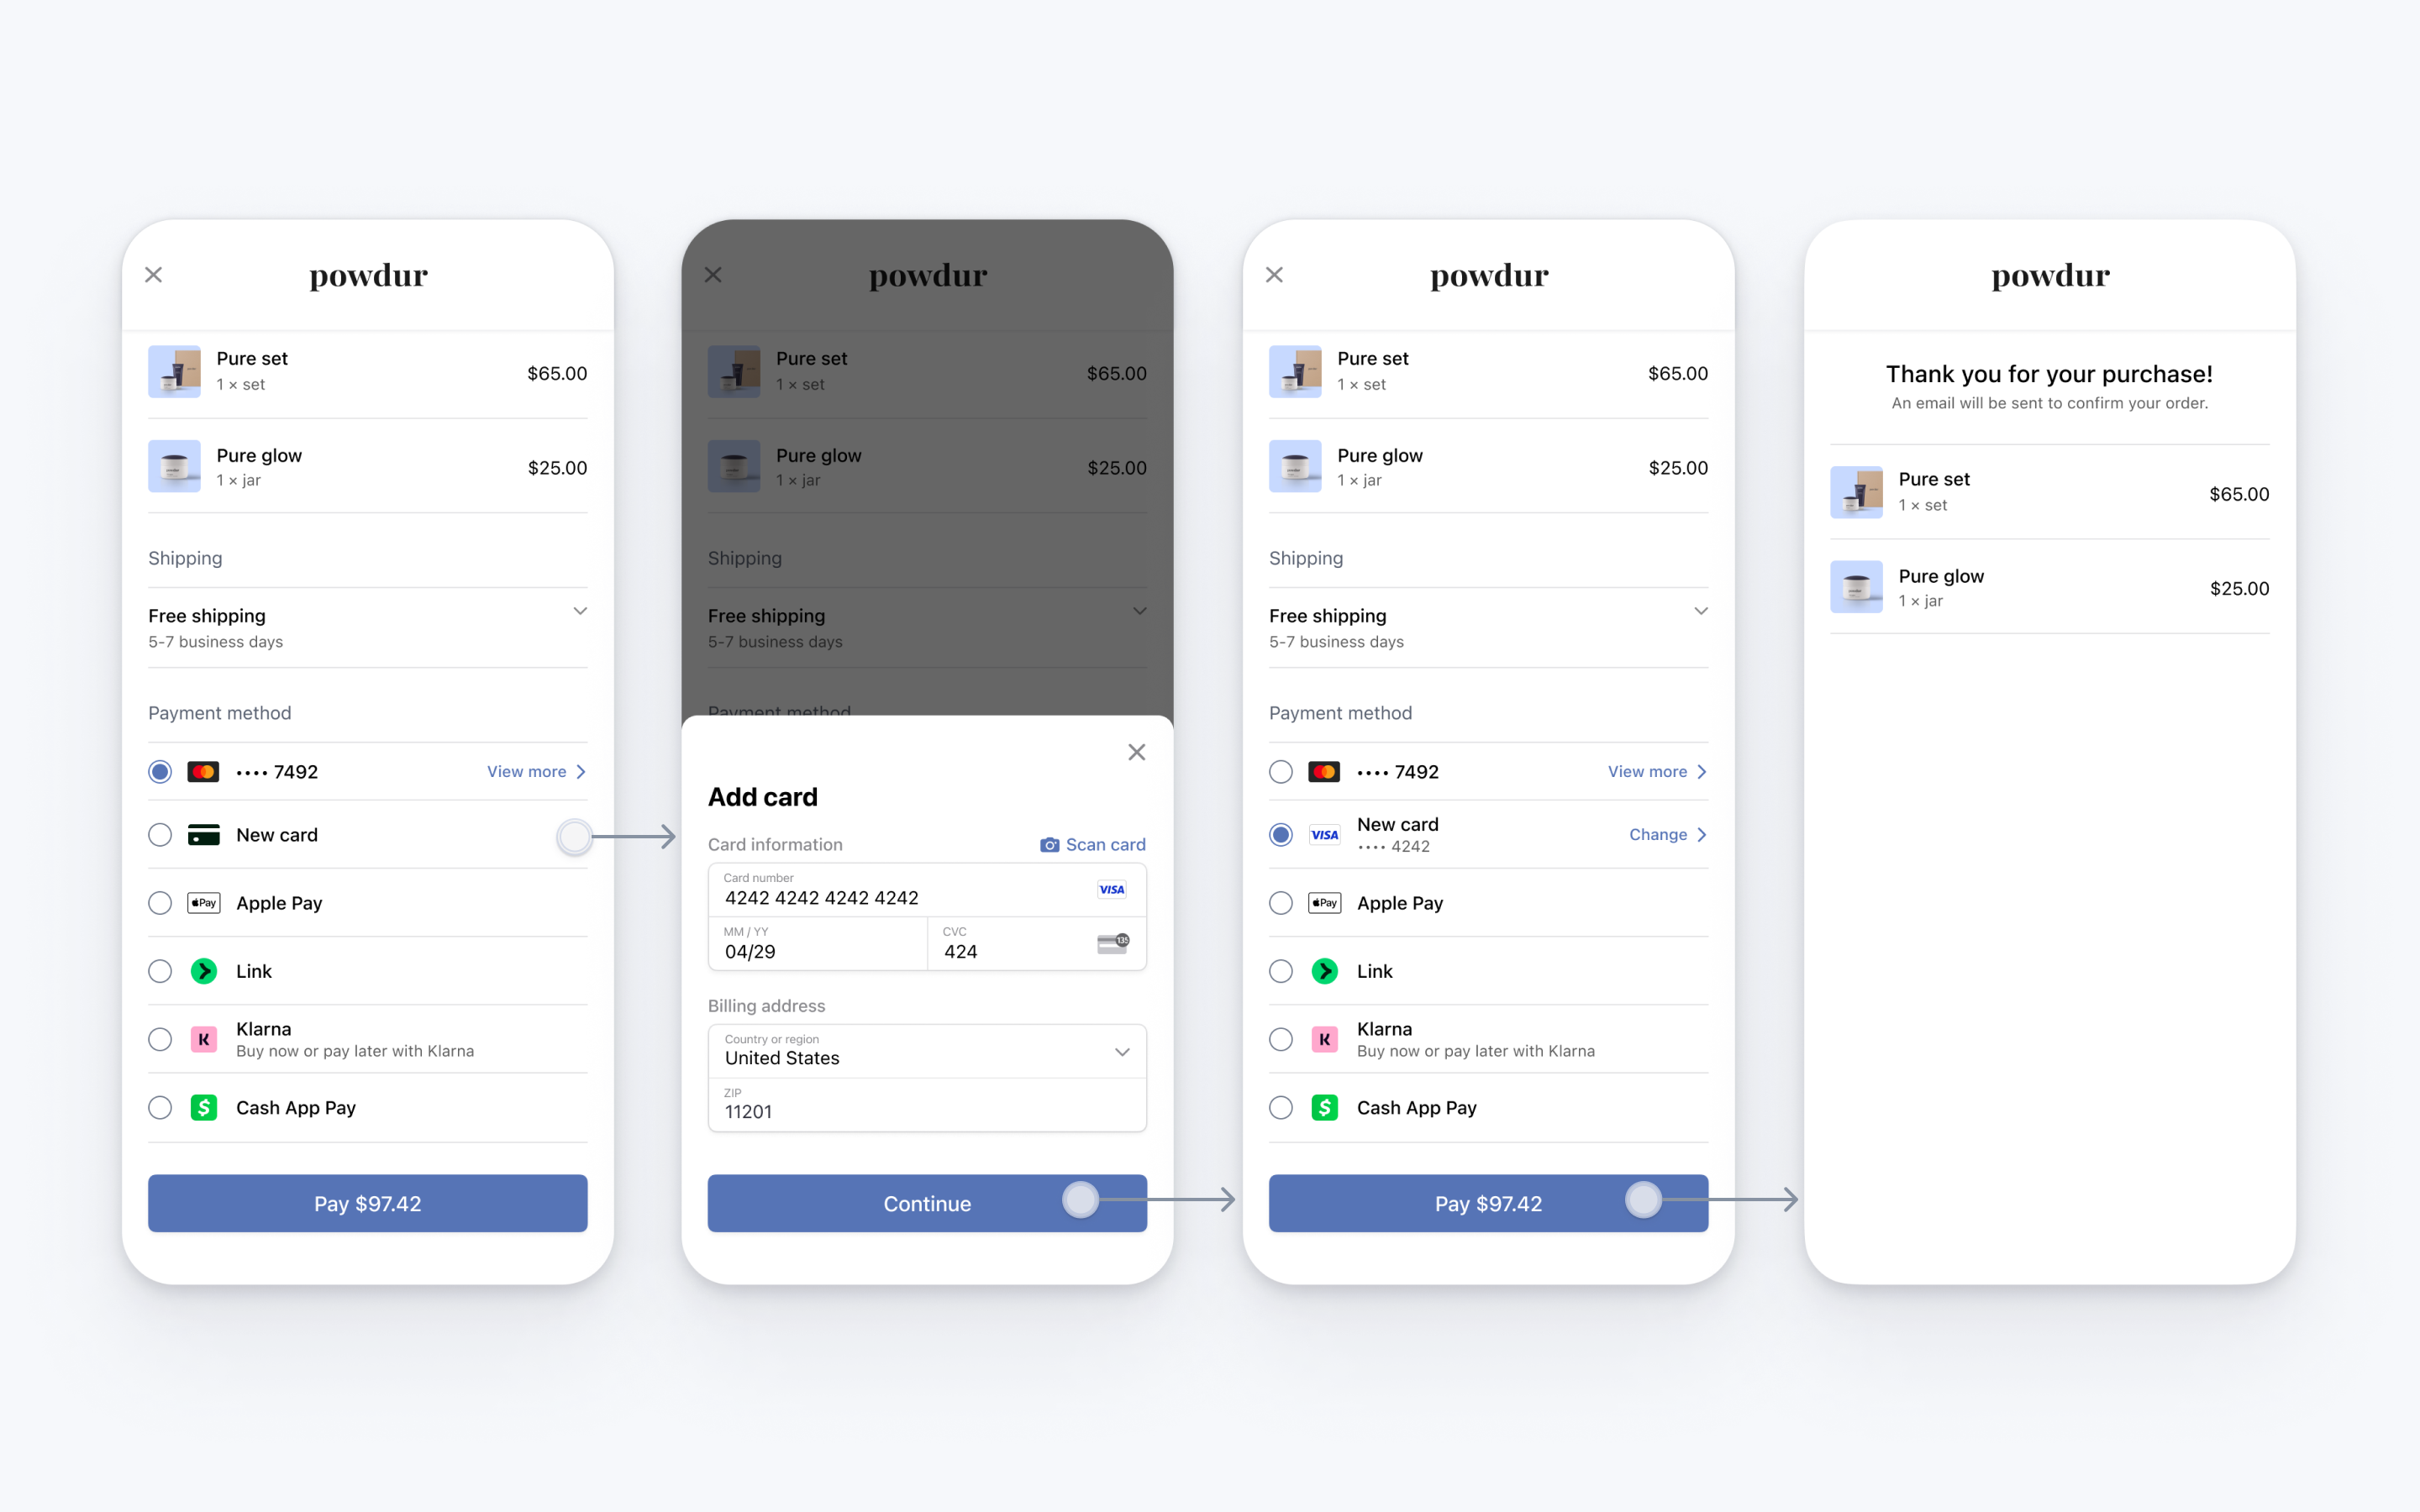
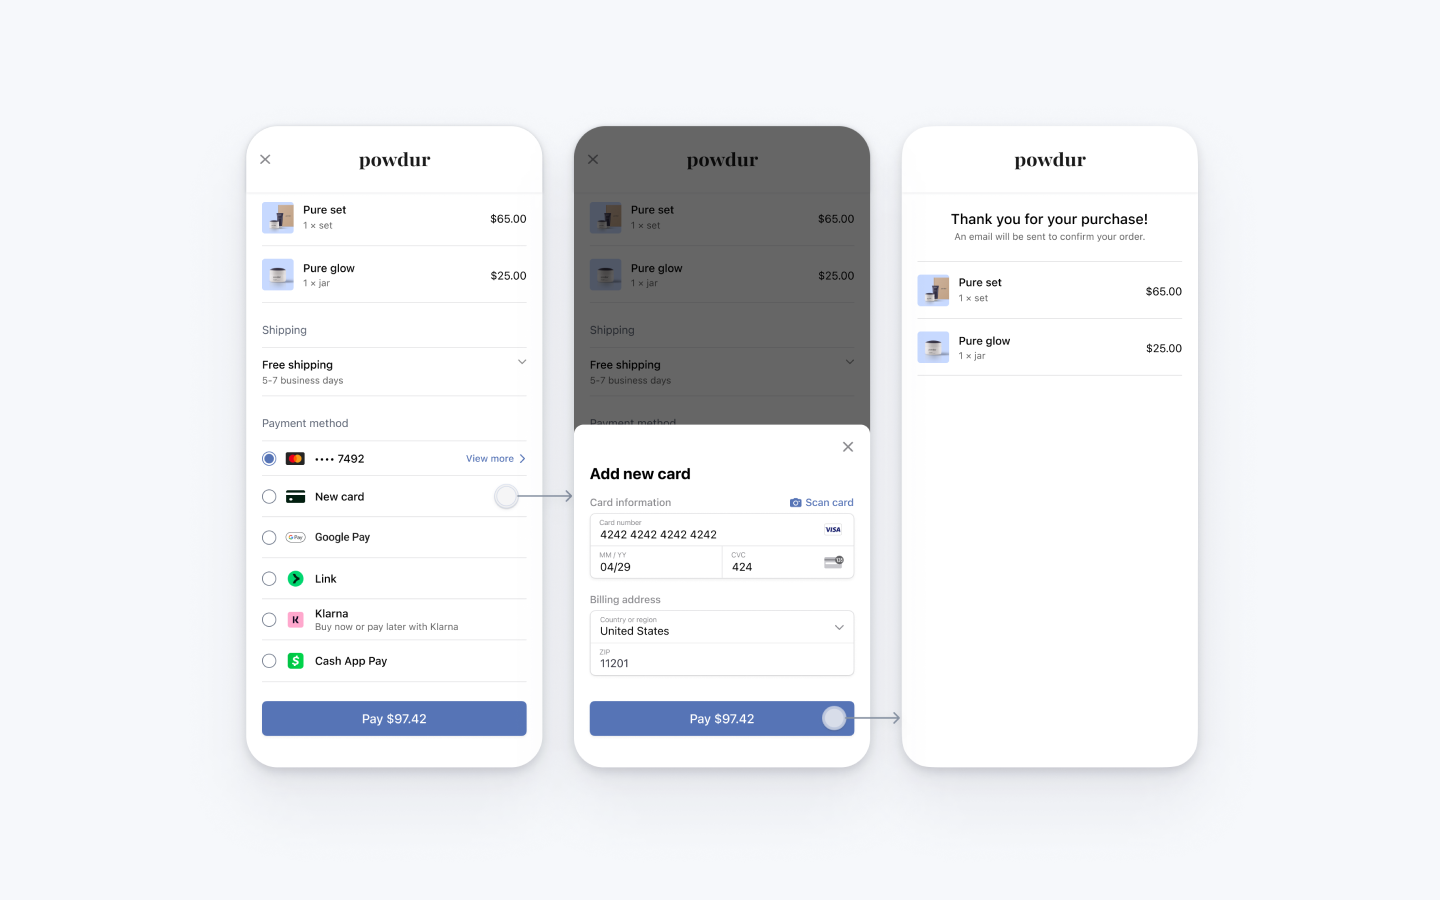
The Payment Element is a customizable component that renders a list of payment methods that you can add into any screen in your app. When customers interact with payment methods in the list, the component opens individual bottom sheets to collect payment details.

A PaymentIntent flow allows you to create a charge in your app. In this integration, you render the Payment Element, create a PaymentIntent, and confirm a charge in your app.

Configurer Stripe
Côté serveurCôté client

Côté serveur

Pour cette intégration, votre serveur doit disposer de points de terminaison qui communiquent avec l’API Stripe. Utilisez nos bibliothèques officielles pour accéder à l’API Stripe à partir de votre serveur :

Command Line
Ruby
Python
PHP
Java
Node.js
Go
.NET
No results
# Available as a gem sudo gem install stripe
Gemfile
Ruby
Python
PHP
Java
Node.js
Go
.NET
No results
# If you use bundler, you can add this line to your Gemfile gem 'stripe'

Côté client

La trousse SDK iOS de Stripe est à code source libre et possède une documentation complète. Il est également compatible avec les applications prenant en charge iOS 13 et les versions ultérieures.

Pour installer la trousse SDK, suivez les étapes ci-après :

  1. Dans Xcode, sélectionnez File (Fichier) > Add Package Dependencies… (Ajouter des dépendances de paquet…), puis saisissez https://github.com/stripe/stripe-ios-spm comme URL du référentiel.
  2. Sélectionnez la dernière version dans notre page des versions.
  3. Ajoutez le produit StripePaymentSheet à la cible de votre application.

Remarque

Pour plus de détails sur la version la plus récente de la trousse SDK et ses versions antérieures, consultez la page des versions sur GitHub. Pour recevoir des notifications lors de la publication d’une nouvelle version, suivez les versions du référentiel.

You also need to set your publishable key so that the SDK can make API calls to Stripe. To get started, you can hardcode the publishable key on the client while you’re integrating, but fetch the publishable key from your server in production.

// Set your publishable key: remember to change this to your live publishable key in production // See your keys here: https://dashboard.stripe.com/apikeys STPAPIClient.shared.publishableKey =
"pk_test_TYooMQauvdEDq54NiTphI7jx"

Activer les moyens de paiement

Accédez aux paramètres des moyens de paiement et activez les moyens de paiement que vous souhaitez prendre en charge. Vous devez activer au moins un moyen de paiement pour créer un PaymentIntent.

Par défaut, Stripe active les cartes et les autres modes de paiement courants qui peuvent vous permettre d’atteindre davantage de clients. Nous vous recommandons toutefois d’activer d’autres modes de paiement pertinents pour votre entreprise et vos clients. Consultez la page Prise en charge des modes de paiement pour en savoir plus sur la prise en charge des produits et des modes de paiement, et notre page de tarification pour prendre connaissance des frais que nous appliquons.

Collecter les informations de paiement
Côté client

The Embedded Mobile Payment Element is designed to be placed on the checkout page of your native mobile app. The element displays a list of payment methods and you can customize it to match your app’s look and feel.

When the customer taps the Card row, it opens a sheet where they can enter their payment method details. The button in the sheet says Continue by default and dismisses the sheet when tapped, which lets your customer finish payment in your checkout.

Payment Element

You can also configure the button to immediately complete payment instead of continuing. To do so, complete this step after following the guide.

Initialize the Payment Element

Call create to instantiate EmbeddedPaymentElement with a EmbeddedPaymentElement.Configuration and a PaymentSheet.IntentConfiguration.

The Configuration object contains general-purpose configuration options for EmbeddedPaymentElement that don’t change between payments, like returnURL. The IntentConfiguration object contains details about the specific payment like the amount and currency, as well as a confirmationTokenConfirmHandler callback. For now, leave its implementation empty. After it successfully initializes, set its presentingViewController and delegate properties.

import StripePaymentSheet class MyCheckoutVC: UIViewController { func createEmbeddedPaymentElement() async throws -> EmbeddedPaymentElement { let intentConfig = PaymentSheet.IntentConfiguration( mode: .payment(amount: 1099, currency: "USD") ) { [weak self] confirmationToken in return await self?.handleConfirmationToken(confirmationToken) } var configuration = EmbeddedPaymentElement.Configuration() configuration.returnURL = "your-app://stripe-redirect" // Use the return url you set up in the previous step let embeddedPaymentElement = try await EmbeddedPaymentElement.create(intentConfiguration: intentConfig, configuration: configuration) embeddedPaymentElement.presentingViewController = self embeddedPaymentElement.delegate = self return embeddedPaymentElement } func handleConfirmationToken(_ confirmationToken: STPConfirmationToken) async throws -> String { // You'll implement this in the "Confirm the payment" section below } }

Add the Payment Element view

After EmbeddedPaymentElement successfully initializes, put its view in your checkout UI.

Remarque

The view must be contained within a scrollable view such as UIScrollView because it doesn’t have a fixed size and can change height after it initially renders.

class MyCheckoutVC: UIViewController { // ... private(set) var embeddedPaymentElement: EmbeddedPaymentElement? private lazy var checkoutButton: UIButton = { let checkoutButton = UIButton(type: .system) checkoutButton.backgroundColor = .systemBlue checkoutButton.layer.cornerRadius = 5.0 checkoutButton.clipsToBounds = true checkoutButton.setTitle("Checkout", for: .normal) checkoutButton.setTitleColor(.white, for: .normal) checkoutButton.translatesAutoresizingMaskIntoConstraints = false checkoutButton.isEnabled = embeddedPaymentElement?.paymentOption != nil checkoutButton.addTarget(self, action: #selector(didTapConfirmButton), for: .touchUpInside) return checkoutButton }() // ... @objc func didTapConfirmButton() { // You'll implement this in the "Confirm the payment" section below } override func viewDidLoad() { super.viewDidLoad() Task { @MainActor in do { // Create a UIScrollView let scrollView = UIScrollView() scrollView.translatesAutoresizingMaskIntoConstraints = false self.view.addSubview(scrollView) // Create the Payment Element let embeddedPaymentElement = try await createEmbeddedPaymentElement() embeddedPaymentElement.delegate = self embeddedPaymentElement.presentingViewController = self self.embeddedPaymentElement = embeddedPaymentElement // Add its view to the scroll view scrollView.addSubview(embeddedPaymentElement.view) // Add your own checkout button to the scroll view scrollView.addSubview(checkoutButton) // Set up layout constraints embeddedPaymentElement.view.translatesAutoresizingMaskIntoConstraints = false NSLayoutConstraint.activate([ scrollView.topAnchor.constraint(equalTo: view.safeAreaLayoutGuide.topAnchor), scrollView.bottomAnchor.constraint(equalTo: view.safeAreaLayoutGuide.bottomAnchor), scrollView.leadingAnchor.constraint(equalTo: view.safeAreaLayoutGuide.leadingAnchor), scrollView.trailingAnchor.constraint(equalTo: view.safeAreaLayoutGuide.trailingAnchor), embeddedPaymentElement.view.topAnchor.constraint(equalTo: scrollView.topAnchor), embeddedPaymentElement.view.leadingAnchor.constraint(equalTo: scrollView.leadingAnchor), embeddedPaymentElement.view.trailingAnchor.constraint(equalTo: scrollView.trailingAnchor), checkoutButton.topAnchor.constraint(equalTo: embeddedPaymentElement.view.bottomAnchor, constant: 4.0), checkoutButton.leadingAnchor.constraint(equalTo: scrollView.safeAreaLayoutGuide.leadingAnchor, constant: 4.0), checkoutButton.trailingAnchor.constraint(equalTo: scrollView.safeAreaLayoutGuide.trailingAnchor, constant: -4.0), ]) } catch { // Handle view not being added to view } } } }

At this point you can run your app and see the Embedded Mobile Payment Element.

Handle height changes

The EmbeddedPaymentElement’s view might grow or shrink in size, which can impact the layout of the view.

Handle height changes by implementing the embeddedPaymentElementDidUpdateHeight delegate method. EmbeddedPaymentElement’s view calls this method inside an animation block that updates its height. Your implementation is expected to call setNeedsLayout() and layoutIfNeeded() on the scroll view that contains the EmbeddedPaymentElement’s view to enable a smooth animation of the height change.

extension MyCheckoutVC: EmbeddedPaymentElementDelegate { func embeddedPaymentElementDidUpdateHeight(embeddedPaymentElement: StripePaymentSheet.EmbeddedPaymentElement) { // Handle layout appropriately self.view.setNeedsLayout() self.view.layoutIfNeeded() } }

We recommend that you test that your view properly responds to changes in height. To do this, call testHeightChange() on EmbeddedPaymentElement to simulate showing and hiding a mandate within the element. Make sure that after calling testHeightChange(), your scroll view adjusts smoothly.

class MyCheckoutVC: UIViewController { override func viewDidLoad() { // This is only for testing purposes: #if DEBUG Timer.scheduledTimer(withTimeInterval: 5.0, repeats: true) { [weak self] _ in Task { @MainActor in self?.embeddedPaymentElement?.testHeightChange() } } #endif } }

Facultatif Display the selected payment option

If you need to access details about the customer’s selected payment option like a label (for example, “····4242”), image (for example, a VISA logo), or billing details to display in your UI, use the EmbeddedPaymentElement’s paymentOption property.

To be notified when the paymentOption changes, implement the embeddedPaymentElementDidUpdatePaymentOption delegate method.

extension MyCheckoutVC: EmbeddedPaymentElementDelegate { func embeddedPaymentElementDidUpdatePaymentOption(embeddedPaymentElement: EmbeddedPaymentElement) { print("The payment option changed: \(embeddedPaymentElement.paymentOption)") checkoutButton.isEnabled = embeddedPaymentElement.paymentOption != nil } }

Facultatif Update payment details

As the customer performs actions that change the payment details (for example, applying a discount code), update the EmbeddedPaymentElement instance to reflect the new values by calling the update method. Some payment methods, like Apple Pay and Google Pay, show the amount in the UI, so make sure it’s always accurate and up to date.

When the update call completes, update your UI. The update call might change the customer’s currently selected payment option.

extension MyCheckoutVC { func update() { Task { @MainActor in var updatedIntentConfig = oldIntentConfig // Update the amount to reflect the price after applying the discount code updatedIntentConfig.mode = PaymentSheet.IntentConfiguration.Mode.payment(amount: 999, currency: "USD") let result = await embeddedPaymentElement?.update(intentConfiguration: updatedIntentConfig) switch result { case .canceled, nil: // Do nothing; this happens when a subsequent `update` call cancels this one break case .failed(let error): // Display error to user in an alert, let users retry case .succeeded: // Update your UI in case the payment option changed } } } }

Confirmer le paiement

When the customer taps the checkout button, call embeddedPaymentElement.confirm() to complete the payment. Be sure to disable user interaction during confirmation.

extension MyCheckoutVC { @objc func didTapConfirmButton() { Task { @MainActor in guard let embeddedPaymentElement else { return } self.view.isUserInteractionEnabled = false // Disable user interaction, show a spinner, and so on before calling confirm. let result = await embeddedPaymentElement.confirm() switch result { case .completed: // Payment completed - show a confirmation screen. case .failed(let error): self.view.isUserInteractionEnabled = true // Encountered an unrecoverable error. You can display the error to the user, log it, and so on. case .canceled: self.view.isUserInteractionEnabled = true // Customer canceled - you should probably do nothing. break } } } }

Next, implement the confirmationTokenConfirmHandler callback you passed to PaymentSheet.IntentConfiguration earlier to send a request to your server. Your server creates a PaymentIntent and returns its client secret. For information about this process, see Create a PaymentIntent.

When the request returns, return your server response’s client secret or throw an error. The EmbeddedPaymentElement confirms the PaymentIntent using the client secret or displays the localized error message in its UI (either errorDescription or localizedDescription). After confirmation completes, EmbeddedPaymentElement isn’t usable. Instead, direct the user to a receipt screen or something similar.

extension MyCheckoutVC { func handleConfirmationToken(_ confirmationToken: STPConfirmationToken) async throws -> String { // Make a request to your own server. Pass `confirmationToken.stripeId` if using server-side confirmation, and return the client secret or throw an error. let myServerClientSecret = try await fetchIntentClientSecret(...) } }

FacultatifClear the selected payment option

If you have payment options external to EmbeddedPaymentElement, you might need to clear the selected payment option. To do this, use the clearPaymentOption API to deselect the selected payment option.

extension MyCheckoutVC: UIViewController { func deselectPaymentMethod() { embeddedPaymentElement?.clearPaymentOption() } }

FacultatifDisplay the mandate yourself

By default, the Embedded Mobile Payment Element displays mandates and legal disclaimers to ensure regulatory compliance. This text must be located close to your buy button. If necessary, disable its display in the view and display it yourself instead.

Avertissement

Your integration must display the mandate text to be compliant. Make sure URLs in the text can be opened by using a UITextView or something similar.

var configuration = EmbeddedPaymentElement.Configuration(...) configuration.embeddedViewDisplaysMandateText = true ... let mandateTextView = UITextView() mandateTextView.attributedText = embeddedPaymentElement.paymentOption.mandateText

FacultatifLet the customer pay immediately in the sheet

Embedded Payment Element

To configure the button in the form sheet to immediately confirm payment, set formSheetAction on your EmbeddedPaymentElement.Configuration object.

The completion block executes with the result of the payment after the sheet dismisses. The embedded UI isn’t usable after payment completes, so we recommend that your implementation directs the user to a different screen, such as a receipt screen.

var configuration = EmbeddedPaymentElement.Configuration() configuration.formSheetAction = .confirm(completion: { result in switch result { case .completed: // Payment completed. You can for example, show a confirmation screen. print("Completed") case .failed(let error): // Encountered an unrecoverable error. You can display the error to the user, log it, etc. print(error) case .canceled: // Customer canceled - you should probably do nothing. break } })

Créer un PaymentIntent
Côté serveur

On your server, create a PaymentIntent with an amount and currency. You can manage payment methods from the Dashboard. Stripe handles the return of eligible payment methods based on factors such as the transaction’s amount, currency, and payment flow. To prevent malicious customers from choosing their own prices, always decide how much to charge on the server-side (a trusted environment) and not the client.

If the call succeeds, return the PaymentIntent client secret. If the call fails, handle the error and return an error message with a brief explanation for your customer.

Remarque

Verify that all IntentConfiguration properties match your PaymentIntent (for example, setup_future_usage, amount, and currency).

main.rb
Ruby
Python
PHP
Node.js
Java
Aller
. NET
No results
require 'stripe' Stripe.api_key =
'sk_test_BQokikJOvBiI2HlWgH4olfQ2'
post '/create-intent' do data = JSON.parse request.body.read params = { amount: 1099, currency: 'usd', # In the latest version of the API, specifying the `automatic_payment_methods` parameter is optional because Stripe enables its functionality by default. automatic_payment_methods: {enabled: true}, } begin intent = Stripe::PaymentIntent.create(params) {client_secret: intent.client_secret}.to_json rescue Stripe::StripeError => e {error: e.error.message}.to_json end end

Configurer une URL de renvoi
Côté client

The customer might navigate away from your app to authenticate (for example, in Safari or their banking app). To allow them to automatically return to your app after authenticating, configure a custom URL scheme and set up your app delegate to forward the URL to the SDK. Stripe doesn’t support universal links.

SceneDelegate.swift
Swift
No results
// This method handles opening custom URL schemes (for example, "your-app://stripe-redirect") func scene(_ scene: UIScene, openURLContexts URLContexts: Set<UIOpenURLContext>) { guard let url = URLContexts.first?.url else { return } let stripeHandled = StripeAPI.handleURLCallback(with: url) if (!stripeHandled) { // This was not a Stripe url – handle the URL normally as you would } }

Additionally, set the returnURL on your EmbeddedPaymentElement.Configuration object to the URL for your app.

var configuration = EmbeddedPaymentElement.Configuration() configuration.returnURL = "your-app://stripe-redirect"

Gérer les événements post-paiement
Côté serveur

Stripe envoie un événement payment_intent.succeeded à l’issue du paiement. Utilisez l’outil de webhook du Dashboard ou suivez le guide sur les webhooks pour recevoir ces événements et exécuter des actions, comme envoyer une confirmation de commande par courriel à votre client, enregistrer la vente dans une base de données ou lancer un flux de livraison.

Écoutez ces événements plutôt que d’attendre un rappel de votre client. Du côté client, il arrive en effet que l’utilisateur ferme la fenêtre de son navigateur ou quitte l’application avant même l’exécution du rappel, et des clients malveillants pourraient manipuler la réponse. En configurant votre intégration de manière à ce qu’elle écoute les événements asynchrones, vous pourrez accepter plusieurs types de moyens de paiement avec une seule intégration.

En plus de gérer l’événement payment_intent.succeeded, nous vous recommandons de gérer les autres événements suivants lorsque vous encaissez des paiements à l’aide du Payment Element :

ÉvénementDescriptionAction
payment_intent.succeededEnvoyé lorsqu’un client a effectué un paiement.Envoyez au client une confirmation de commande et traitez sa commande.
payment_intent.processingEnvoyé lorsqu’un client a entrepris un paiement, mais qu’il ne l’a pas encore finalisé. Dans la plupart des cas, cet événement est envoyé lorsque le client entreprend un prélèvement bancaire. Il est suivi par un événement payment_intent.succeeded ou payment_intent.payment_failed.Envoyez au client une confirmation de commande qui indique que son paiement est en attente. Pour des marchandises dématérialisées, nous vous recommandons de traiter la commande sans attendre que le paiement soit effectué.
payment_intent.payment_failedEnvoyé lorsqu’un client tente d’effectuer un paiement, mais que le paiement échoue.Si un paiement passe de l’état processing à l’état payment_failed, proposez au client de retenter le paiement.

Tester l'intégration

Numéro de carteScénarioComment tester
Le paiement par carte est réussi et ne nécessite pas d’authentification.Remplissez le formulaire de paiement par carte de crédit en saisissant le numéro de carte de crédit ainsi qu’une date d’expiration, un CVC et un code postal de votre choix.
Le paiement par carte requiert une authentification.Remplissez le formulaire de paiement par carte de crédit en saisissant le numéro de carte de crédit ainsi qu’une date d’expiration, un CVC et un code postal de votre choix.
La carte est refusée avec un code de refus de type insufficient_funds.Remplissez le formulaire de paiement par carte de crédit en saisissant le numéro de carte de crédit ainsi qu’une date d’expiration, un CVC et un code postal de votre choix.
Le numéro de carte UnionPay a une longueur variable de 13 à 19 chiffres.Remplissez le formulaire de paiement par carte de crédit en saisissant le numéro de carte de crédit ainsi qu’une date d’expiration, un CVC et un code postal de votre choix.

Consultez la section Test pour obtenir des informations supplémentaires sur la manière de tester votre intégration.

FacultatifEnable saved cards
Côté serveurCôté client

EmbeddedPaymentElement can display a Save this card for future use checkbox that saves the customer’s card, and display the customer’s saved cards. To enable this checkbox, create a Customer object on your server and an associated CustomerSession, with payment_method_save set to enabled.

Comparer les références Customers v1 et Accounts v2

Si votre plateforme Connect utilise des comptes configurés par le client, utilisez notre guide pour remplacer le Client et des références d’événements dans votre code avec les références équivalentes de l’API Accounts v2.

const stripe = require('stripe')('sk_test_your_secret_key'); app.post('/mobile-payment-element', async (req, res) => { // Use an existing Customer ID if this is a returning customer. const customer = await stripe.customers.create(); const customerSession = await stripe.customerSessions.create({ customer: customer.id, components: { mobile_payment_element: { enabled: true, features: { payment_method_save: 'enabled', payment_method_redisplay: 'enabled', payment_method_remove: 'enabled' } }, }, }); res.json({ customerSessionClientSecret: customerSession.client_secret, customer: customer.id, }); });

Next, configure EmbeddedPaymentElement with the Customer’s ID and the CustomerSession client secret.

@_spi(CustomerSessionBetaAccess) import StripePaymentSheet var configuration = EmbeddedPaymentElement.Configuration() configuration.customer = .init(id: customerId, customerSessionClientSecret: customerSessionClientSecret) self.embeddedPaymentElement = try await EmbeddedPaymentElement.create(..., configuration: configuration)

FacultatifAllow delayed payment methods
Côté client

Delayed payment methods don’t guarantee that you’ll receive funds from your customer at the end of the checkout either because they take time to settle (for example, US Bank Accounts, SEPA Debit, iDEAL, and Bancontact) or because they require customer action to complete (for example, OXXO, Konbini, and Boleto).

By default, EmbeddedPaymentElement doesn’t display delayed payment methods. To opt in, set allowsDelayedPaymentMethods to true in your EmbeddedPaymentElement.Configuration. This step alone doesn’t activate any specific payment methods; rather, it indicates that your app is able to handle them. For example, although OXXO is currently not supported by EmbeddedPaymentElement, if it becomes supported and you’ve updated to the latest SDK version, your app will be able to display OXXO as a payment option without additional integration changes.

var configuration = EmbeddedPaymentElement.Configuration() configuration.allowsDelayedPaymentMethods = true self.embeddedPaymentElement = try await EmbeddedPaymentElement.create(..., configuration: configuration)

If the customer successfully uses one of these delayed payment methods in EmbeddedPaymentElement, the payment result returned is .completed.

FacultatifActiver Apple Pay

Remarque

If your checkout screen has a dedicated Apple Pay button, follow the Apple Pay guide and use ApplePayContext to collect payment from your Apple Pay button. You can use EmbeddedPaymentElement to handle other payment method types.

Demander un ID de marchand Apple

Pour obtenir un ID de marchand Apple, demandez un nouvel identifiant sur le site Web Apple Developer.

Renseignez le formulaire en indiquant une description et un identifiant. La description n’est destinée qu’à votre propre information et vous pourrez la modifier ultérieurement au besoin. En ce qui concerne l’identifiant, Stripe vous recommande d’utiliser le nom de votre application (par exemple, merchant.com.{{YOUR_APP_NAME}}).

Créer un nouveau certificat Apple Pay

Créez un certificat permettant à votre application de chiffrer les données de paiement.

Accédez aux paramètres des certificats iOS dans le Dashboard, cliquez sur Ajouter une nouvelle application et suivez le guide.

Téléchargez un fichier de demande de signature de certificat (CSR) pour obtenir un certificat sécurisé auprès d’Apple qui vous permet d’utiliser Apple Pay.

Un fichier CSR doit être utilisé pour émettre exactement un certificat. Si vous changez votre identifiant Apple Merchant ID, vous devez accéder aux paramètres de certificat iOS du Dashboard pour obtenir un nouveau CSR et un nouveau certificat.

Réaliser une intégration avec Xcode

Ajoutez la fonctionnalité Apple Pay à votre application. Dans Xcode, ouvrez les paramètres de votre projet, cliquez sur l’onglet Signing & Capabilities (Signature et fonctionnalités), et ajoutez la fonctionnalité Apple Pay. On pourrait alors vous demander de vous connecter à votre compte de développeur. Sélectionnez l’ID du marchand que vous venez de créer, et votre application peut maintenant accepter Apple Pay.

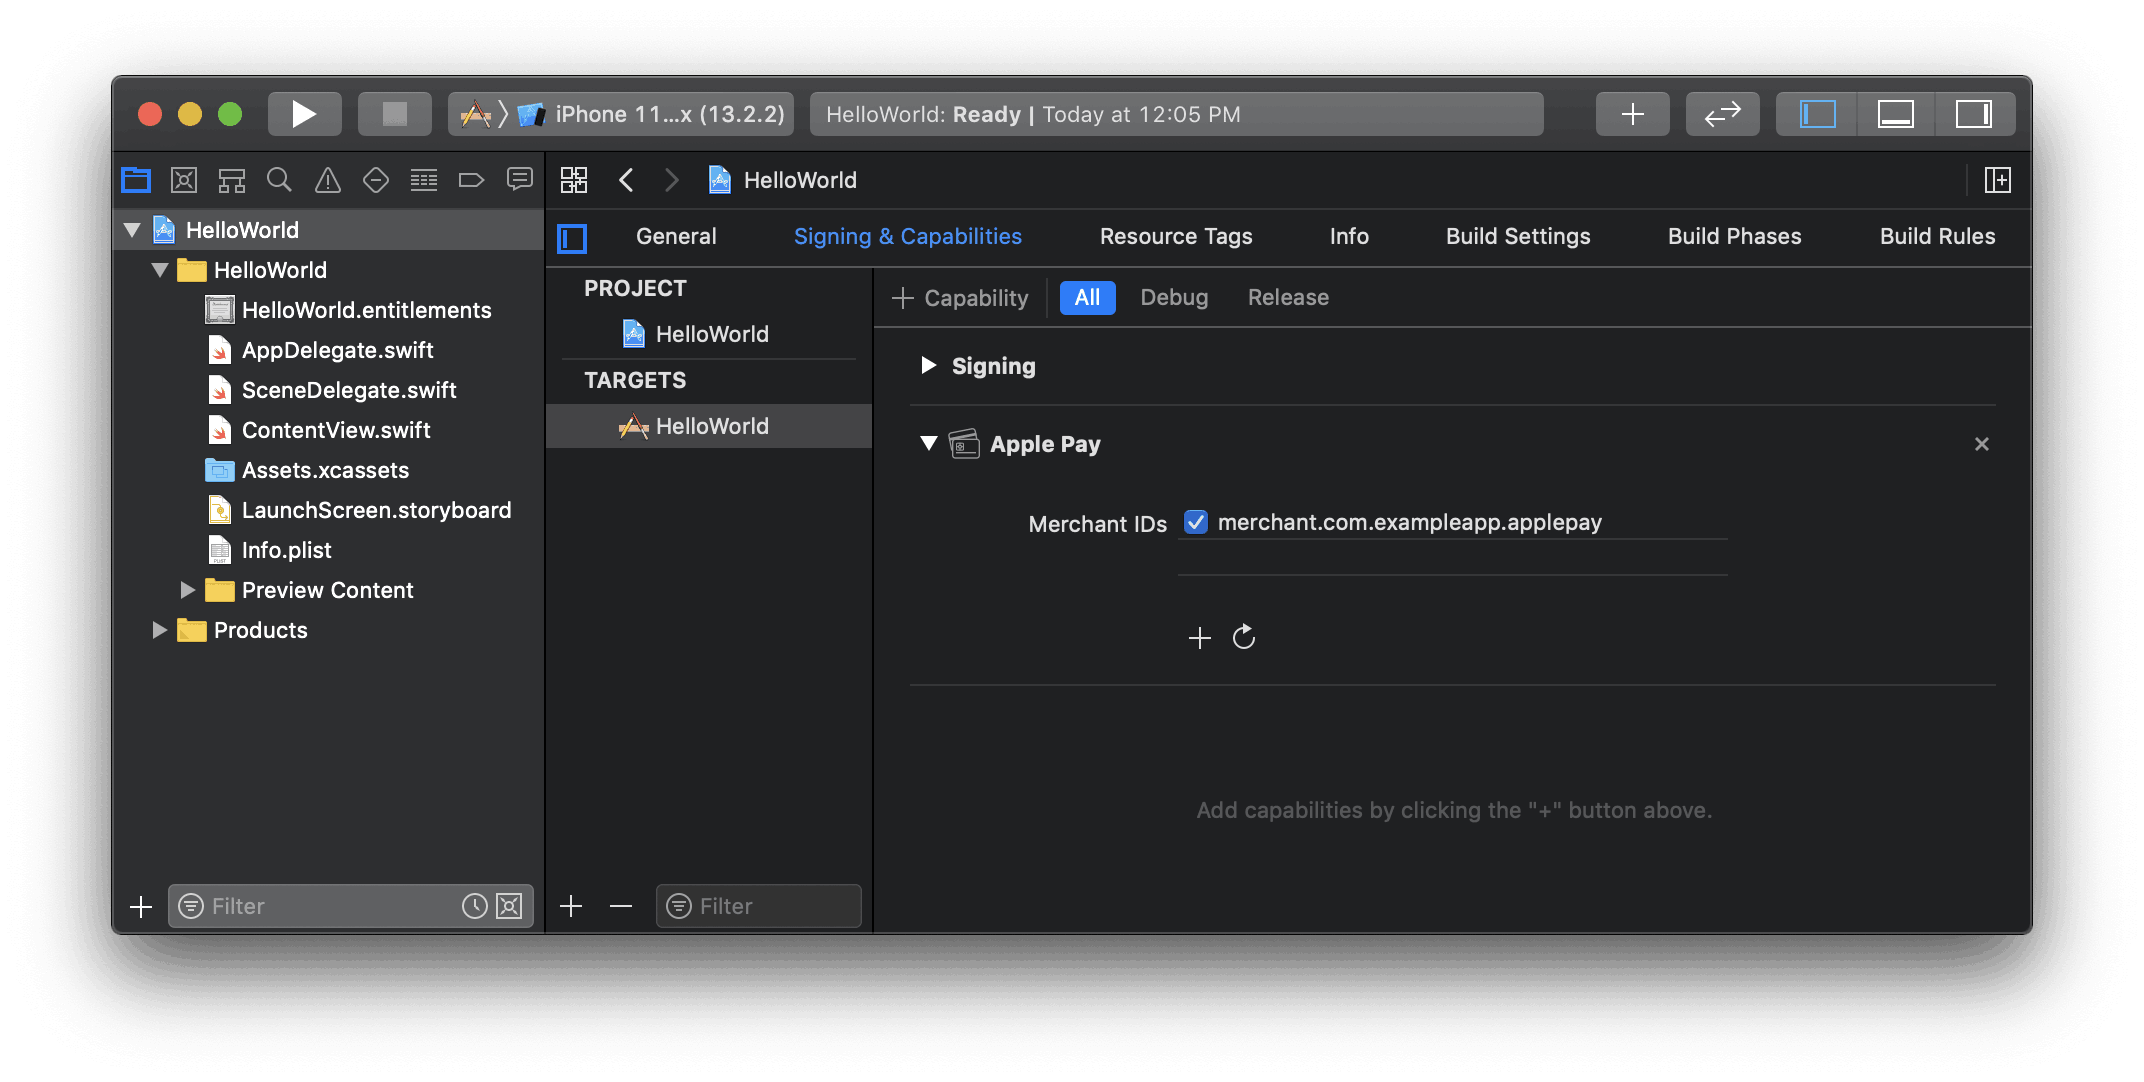
Activer la fonctionnalité Apple Pay dans Xcode

Ajouter Apple Pay

To add Apple Pay to EmbeddedPaymentElement, set applePay after initializing EmbeddedPaymentElement.Configuration with your Apple merchant ID and your business’s country code.

var configuration = EmbeddedPaymentElement.Configuration() configuration.applePay = .init( merchantId: "merchant.com.your_app_name", merchantCountryCode: "US" )

Suivi des commandes

To add order tracking information in iOS 16 or later, configure an authorizationResultHandler in your PaymentSheet.ApplePayConfiguration.Handlers. Stripe calls your implementation after the payment is complete, but before iOS dismisses the Apple Pay sheet.

In your authorizationResultHandler implementation, fetch the order details from your server for the completed order. Add the details to the provided PKPaymentAuthorizationResult and return the modified result.

Pour en savoir plus sur le suivi des commandes, consultez la documentation sur les commandes du portefeuille numérique Apple.

let customHandlers = PaymentSheet.ApplePayConfiguration.Handlers( authorizationResultHandler: { result in do { // Fetch the order details from your service let myOrderDetails = try await MyAPIClient.shared.fetchOrderDetails(orderID: orderID) result.orderDetails = PKPaymentOrderDetails( orderTypeIdentifier: myOrderDetails.orderTypeIdentifier, // "com.myapp.order" orderIdentifier: myOrderDetails.orderIdentifier, // "ABC123-AAAA-1111" webServiceURL: myOrderDetails.webServiceURL, // "https://my-backend.example.com/apple-order-tracking-backend" authenticationToken: myOrderDetails.authenticationToken) // "abc123" // Return your modified PKPaymentAuthorizationResult return result } catch { return PKPaymentAuthorizationResult(status: .failure, errors: [error]) } } ) var configuration = EmbeddedPaymentElement.Configuration() configuration.applePay = .init(merchantId: "merchant.com.your_app_name", merchantCountryCode: "US", customHandlers: customHandlers)

FacultatifActiver le balayage de carte

Pour que vous puissiez utiliser la numérisation des cartes, définissez le paramètre NSCameraUsageDescription (Confidentialité – Description de l’utilisation de l’appareil photo) dans le fichier Info.plist de votre application et expliquez la raison pour laquelle vous devez accéder à l’appareil photo (« Pour numériser des cartes », par exemple). Les appareils équipés d’iOS 13 ou version ultérieure prennent en charge la numérisation des cartes.

FacultatifCustomize the element

All customization is configured through the EmbeddedPaymentElement.Configuration object.

Aspect

Customize colors, fonts, and so on to match the look and feel of your app by using the appearance API.

Collecter les adresses des utilisateurs

Collect local and international shipping or billing addresses from your customers using the Address Element.

Nom d’affichage du marchand

Specify a customer-facing business name by setting merchantDisplayName. By default, this is your app’s name.

var configuration = EmbeddedPaymentElement.Configuration() configuration.merchantDisplayName = "My app, Inc."

Dark mode

EmbeddedPaymentElement automatically adapts to the user’s system-wide appearance settings (light and dark mode). If your app doesn’t support dark mode, you can set style to alwaysLight or alwaysDark mode.

var configuration = EmbeddedPaymentElement.Configuration() configuration.style = .alwaysLight

FacultatifEnable CVC recollection on confirmation

Pour collecter à nouveau le CVC d’une carte enregistrée lors de la confirmation de la PaymentIntent, votre intégration doit collecter les informations sur le paiement avant de créer une PaymentIntent.

Mettre à jour la configuration de l’Intent

PaymentSheet.IntentConfiguration accepte un paramètre facultatif qui contrôle le moment de collecter à nouveau le CVC pour une carte enregistrée.

let intentConfig = PaymentSheet.IntentConfiguration( mode: .payment(amount: 1099, currency: "USD"), confirmHandler: { confirmationToken in // Handle ConfirmationToken... }, requireCVCRecollection: true)

Mettre à jour les paramètres de création de l’Intent

Pour collecter à nouveau le CVC lors de la confirmation du paiement, ajoutez les paramètres customerId et require_cvc_recollection lors de la création du PaymentIntent.

main.rb
Ruby
Python
PHP
Node.js
Java
Go
.NET
No results
require 'stripe' Stripe.api_key =
'sk_test_BQokikJOvBiI2HlWgH4olfQ2'
post '/create-intent' do data = JSON.parse request.body.read params = { amount: 1099, currency: 'usd', # In the latest version of the API, specifying the `automatic_payment_methods` parameter is optional because Stripe enables its functionality by default. automatic_payment_methods: {enabled: true}, customer: customer.id, payment_method_options: { card: {require_cvc_recollection: true} } } begin intent = Stripe::PaymentIntent.create(params) {client_secret: intent.client_secret}.to_json rescue Stripe::StripeError => e {error: e.error.message}.to_json end end
Cette page vous a-t-elle été utile?
OuiNon
  • Besoin d'aide? Contactez le service d'assistance.
  • Consultez notre journal des modifications.
  • Des questions? Contactez l'équipe commerciale.
  • GML? Lire llms.txt.
  • Optimisé par Markdoc